Adjusting the Mirrors on a CO₂ Laser – A Step-by-Step Guide
The proper adjustment of mirrors on a CO2 laser can be incredibly frustrating. Hours of tweaking, yet somehow, the beam still doesn’t hit the center of the next mirror. The beam fires wildly in all directions, and just when one position seems right, it doesn’t align elsewhere. If you’ve felt this way, you’re in the right place! This guide explains in five simple steps how to properly adjust the mirrors on your CO2 laser. Don’t throw your laser out the window just yet— CO2 laser mirror alignment is surprisingly easy once you follow two basic rules.
Why Adjust the Mirrors on a Laser?
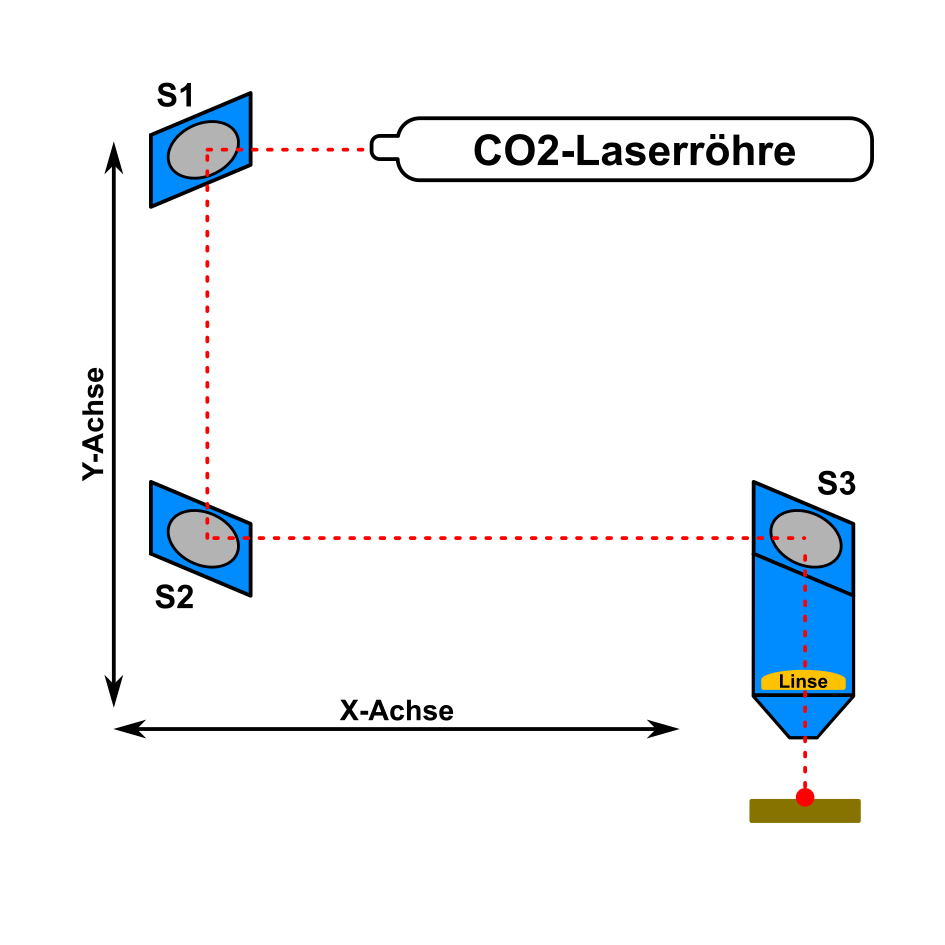
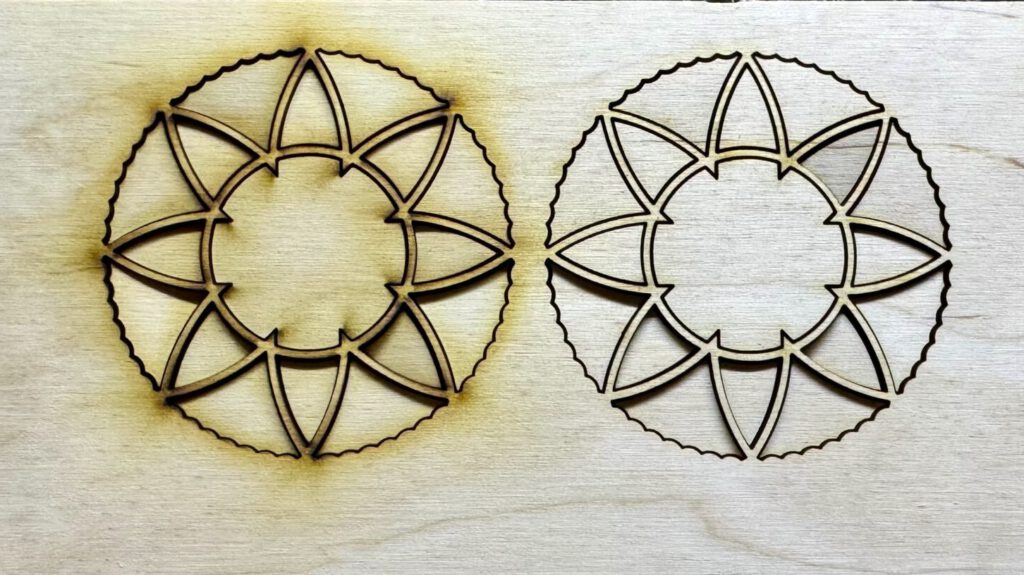
The beam in a CO2 laser is redirected from the tube to the lens through several mirrors. At full power, the beam has a thickness of 5–6 mm. If it doesn’t hit all mirrors dead center, it won’t be fully reflected, causing power loss. This results in poor cutting performance and defects in the workpiece.
Adjusting the mirrors becomes simple if you meticulously follow these two fundamental rules:
The Two Golden Rules of Mirror Alignment
- Work from Back to Front.
- First Parallel, Then Centered.
These rules are straightforward: if you adhere to them, you’ll be done in one pass. If you break a rule, you’ll have to start all over again. But what do these rules mean?
Rule 1: Work from Back to Front
Aligning the mirrors follows the path of the laser beam—from the tube to the lens. Only move to the next mirror after the current one is perfectly aligned. Remember: skipping a step or moving to the next mirror too soon will force you to start all over again!
Rule 2: First Parallel, Then Centered
This is the more important of the two rules. At first, it’s not about hitting the center of the next mirror immediately. The primary goal is to ensure the laser beam consistently hits the same spot, making it parallel to the system’s axes. If a mirror is moved, the beam must still hit exactly the same spot. At this stage, it doesn’t matter whether this point is in the mirror’s center or even on the mirror at all. It could be off the mirror entirely—what’s important is consistency.
Once the beam consistently hits the same spot along an axis, the alignment can be centered on the mirror. To do this, adjust the mirror to the beam. That’s why all mirrors are mounted on adjustable holders.
Step-by-Step Guide: Adjusting Laser Mirrors
Let’s get started. Here’s what you’ll need:
- Painter’s tape (Amazon*)
- Marker pen
- Laser safety goggles (Amazon)* (!), as you’ll be working with an open device, and reflected laser beams can be hazardous.
Step 1: Align Mirror 1
Following Rule 1, start with Mirror 1 (S1) next to the tube. Place a piece of painter’s tape over the mirror or its alignment aid if available. Fire a very short test pulse. Most lasers have a button on the controller for this. A small dot should now appear on the tape. If the tape catches fire, reduce the laser’s power. ????
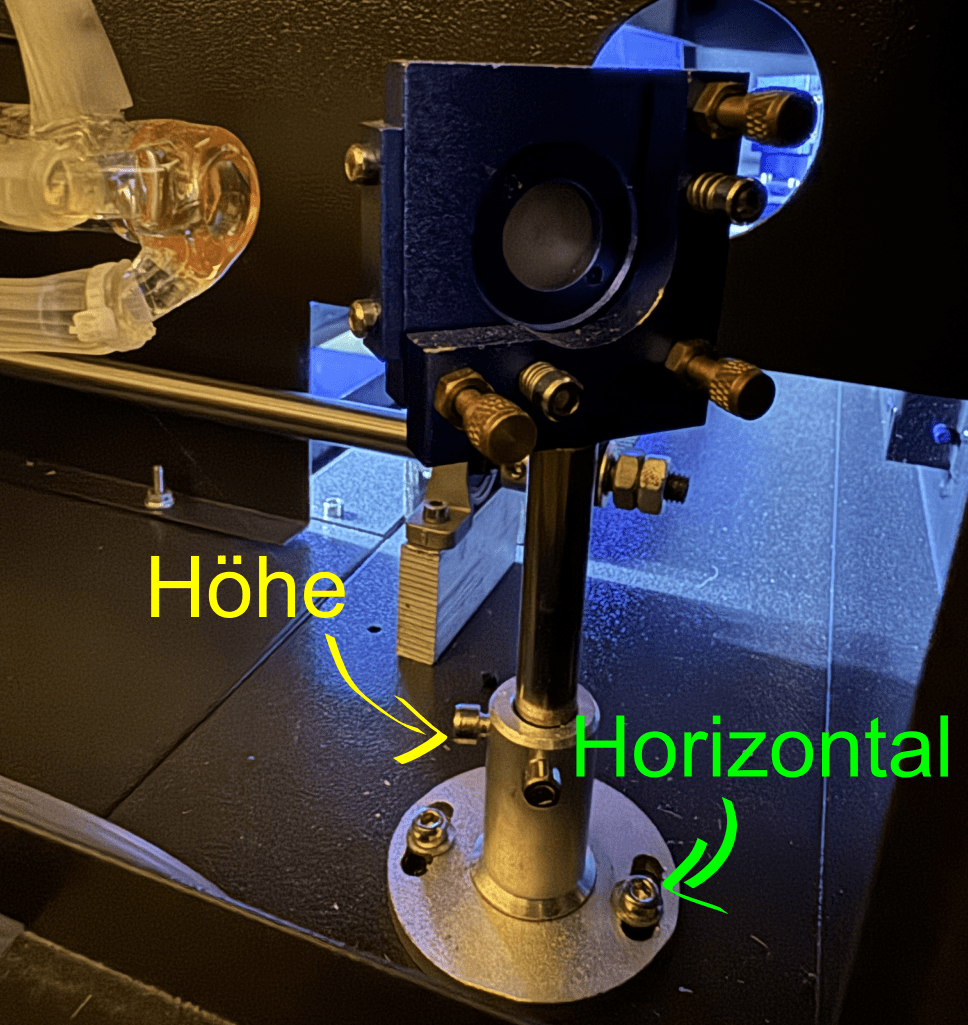
Adjust S1 so the beam hits its center. Most mirrors have slots for horizontal adjustment and a mechanism for height adjustment.
If your mirror cannot be adjusted, you’ll need to align the laser tube instead. After making adjustments, fire another test pulse. Repeat until the dot is perfectly centered. Once aligned, move on.
Step 2: Use the ACD Method to Adjust Mirrors
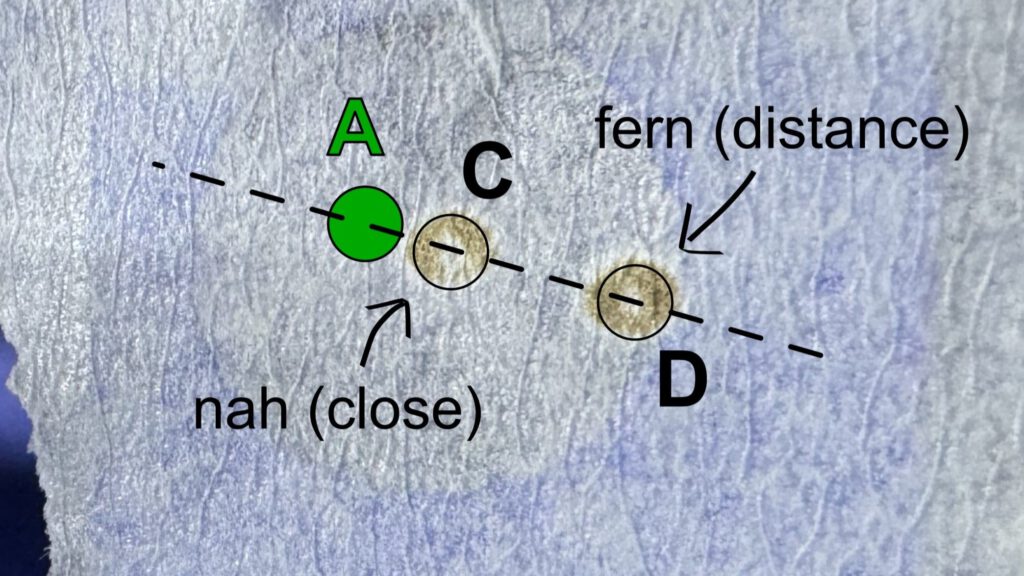
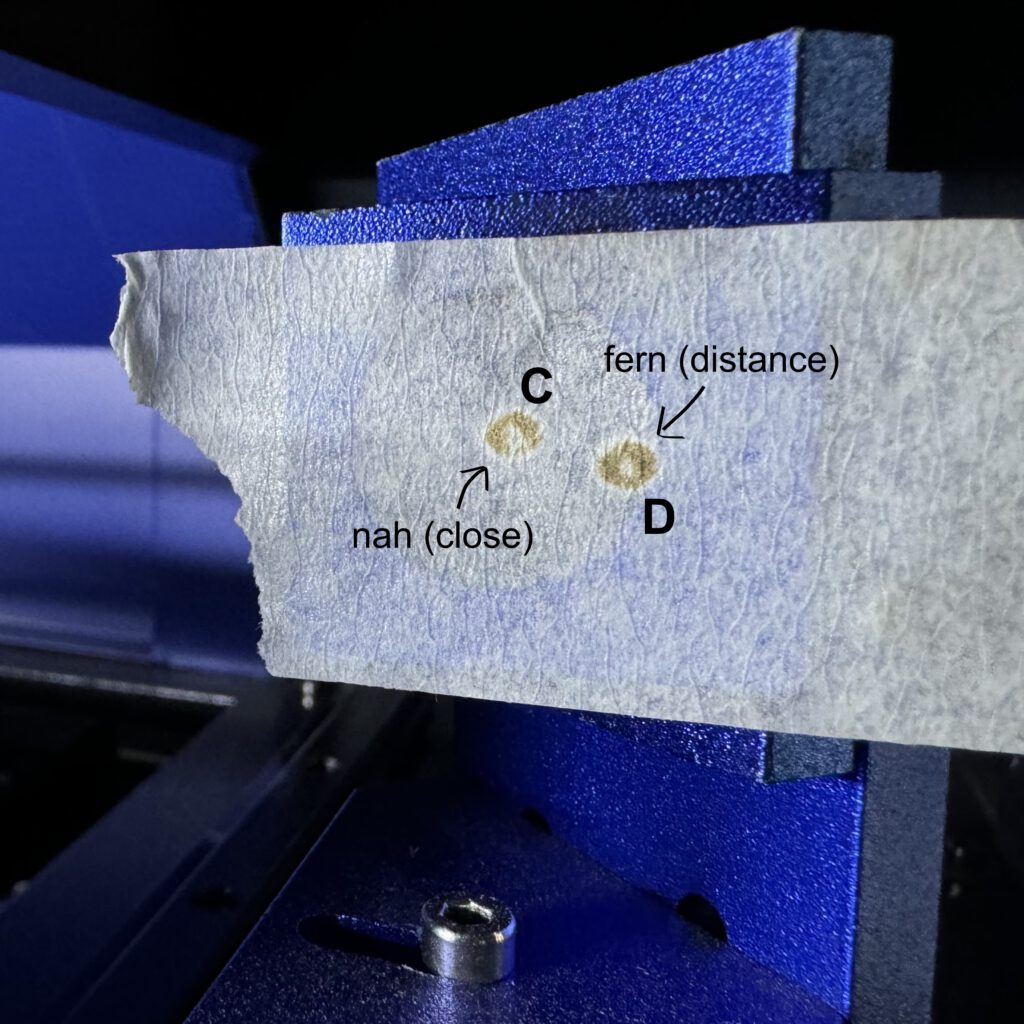
Attach painter’s tape to the second mirror (S2). Move S2 close to S1 and fire a short pulse. Then, move S2 far along the Y-axis and fire another pulse. You should see two dots on the tape. If not, one of the dots is off the tape. To identify the drift direction, move S2 slightly closer to S1 for the second pulse. Label the dots as C (close) and D (distant).
The goal is to adjust S1 so both points overlap. The ACD method helps here:
- A (aligned) always lies on the line between C and D.
- A is always near C.
- A is always “behind” C.

At this stage, it doesn’t matter if A hits the mirror’s center or not. Even if A is off the mirror, focus on ensuring the beam runs parallel to the Y-axis.
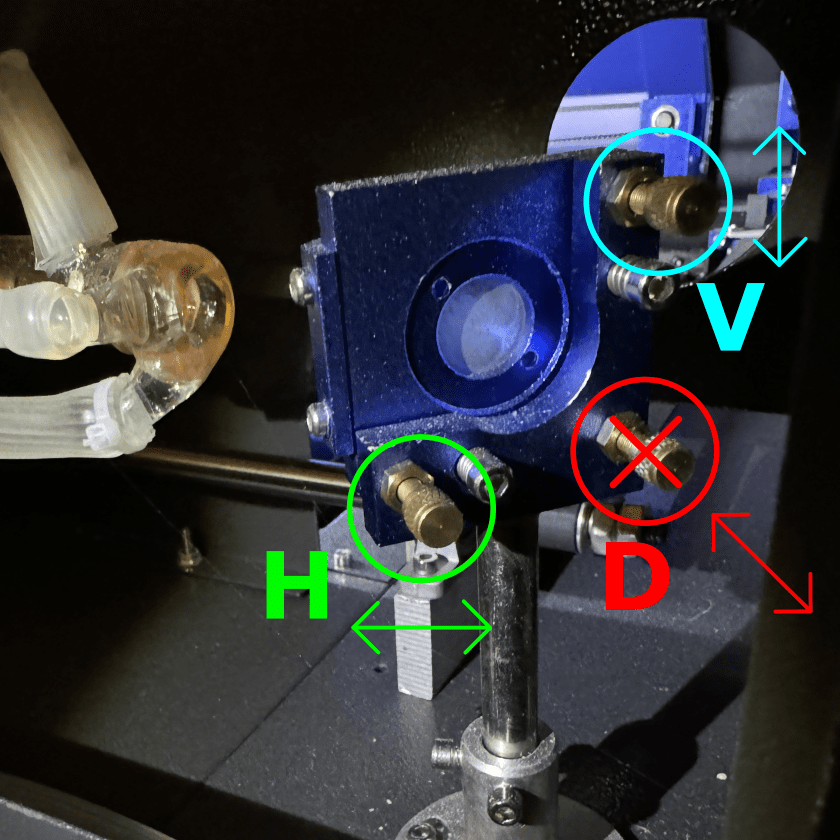
Step 3: Align Mirrors Using Adjustment Screws
With A identified, adjust the mirror to redirect the beam there using the adjustment screws on S1. Mirrors typically have three screws:
- H for horizontal adjustment
- V for vertical adjustment
- D for diagonal adjustment (avoid this unless necessary)
For example, if the beam needs to move slightly left and up, turn H counterclockwise and V clockwise. Fire test pulses at C and D to confirm. Repeat until both points overlap perfectly. Tighten the lock nuts on S1 to secure the settings.
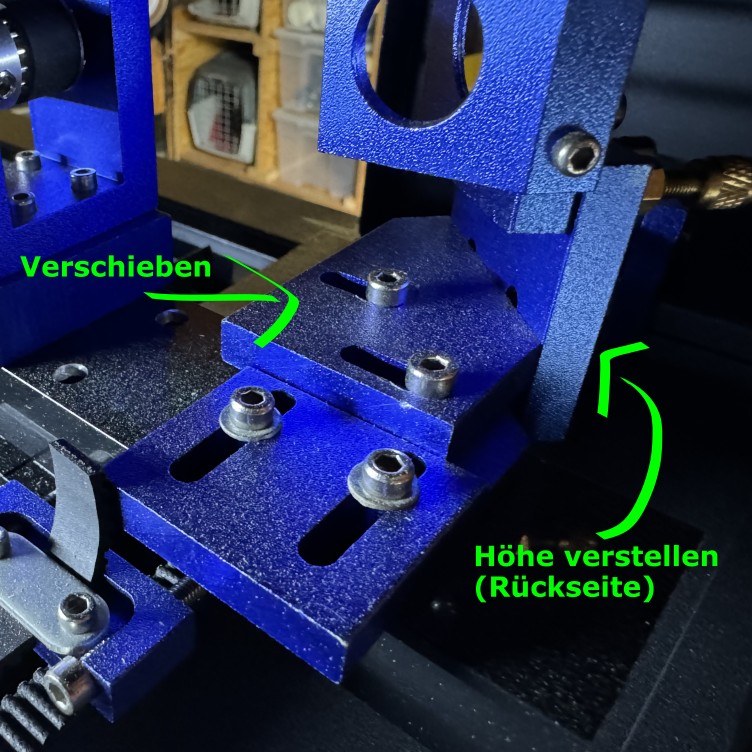
Step 4: Adjust Mirror Positions
Shift Mirror 2 so the aligned beam hits its center. Loosen S2’s screws, reposition the mirror, and tighten the screws. Use washers if vertical adjustment isn’t possible.
Repeat the same process for S2:
- Attach tape to S3.
- Fire test pulses (C and D).
- Identify A using the ACD method.
- Adjust S2 to align the beam.
- Secure the screws.
- Adjust S3 so the beam hits its center.
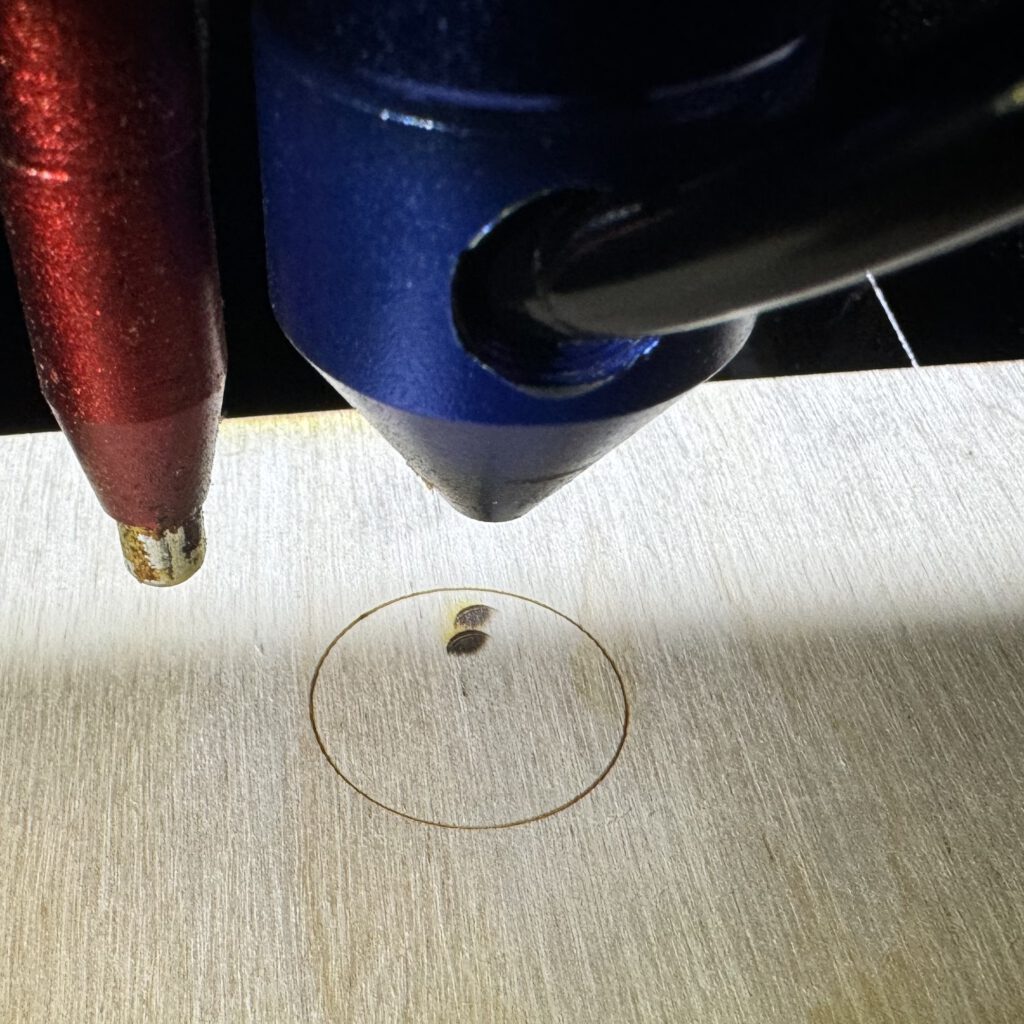
Step 5: Align the Beam Vertically with Mirror 3
The laser beam should pass centrally through the lens and exit vertically from the nozzle. Perform this step with the lens removed.
Mark a 20 mm circle on a piece of wood and place it under the nozzle. Fire one pulse close to the wood and another farther away. Adjust the height via the laser table or the tube length, depending on your laser’s design.
If the two points don’t overlap, adjust S3 using the ACD method. Once the points overlap, congratulations! All mirrors are perfectly aligned. From now on, mirror alignment will be a breeze.
ADVERTISEMENT: The links marked with an asterisk (*) are affiliate links. If you click on such a link and make a purchase on the destination page, we receive a referral commission from the respective provider or online store. This helps us cover our costs (e.g., web hosting). There are no additional costs or price disadvantages for you when purchasing.
Pingback: Upgrade For Your K40: The Cloudray Mirror Set Put To The Test - laser-crafting
Hello,
I read your alignment document with great interest. The structure of the document was very good. There are some necessary information omited and some statements not clearly stated. Overall informative.
I sensed it was a translation from German. If so is it possible to accure that version, with hope it will provide more useful information.
Thank You,
Greg Fischer
Camano Island, WA USA
greg@lookforward.us
01 714 306-6745
Hello Greg,
thank you for your comment. I’m glad you found the article helpful 🙂
Yes, you are right, I wrote the article in German and then translated it to English. Which particular part would need improvement? I would be happy to give it a rewrite with some guidance from a native speaker 🙂
Hello,
Sorry for the delay in responding to your reply.
As an english speaker some of your translated of the Laser Alignment Procedure is dificult to understand.
As I said before it your’s is the most complete and orderly documemt on the subject that I have found. I would like to edit it into an english version.
As it happens I am married to a Hamburg girl who can make a proper translation.
I would like your permission to call on you to as needed to clarify text I don’t understand.
I would of course provide you a copy for you to use as you like.
Thank You,
Greg Fischer
Camano Island, WA USA 98282
1 714 306-6745